http://www.clixsense.com/?2268753
Important Message - Please read:
Effective November 1, 2007
ClixSense.com EXPLOSIVE new affiliate program!
Dear ClixSense.com member,
We've heard from many of you telling us how thankful you are for
ClixSense.com and our affiliate program. You've told us how refreshing
it is to finally find a program that actually pays. Many of you are
earning monthly paychecks from clicking advertisements, and from
referring new members. You've been paid for each ad you click, another
10 cents for each free member you refer, and $5 for each of your
referrals who have upgraded to Premium ClixSense accounts.
The ClixSense.com affiliate program has gotten even better!
Effective November 1, 2007, not only do you still get paid for clicking
ads, still get paid 10 cents for referring new members, and 10% of ad
purchase revenues from your downline... Premium members will now get
paid FIVE LEVELS deep for referrals who upgrade their accounts to
Premuim accounts! You heard it right - Five Levels! With the old
program you only received $5 for each upgrade you referred. If you
referred three, your maximum earnings for those referrals was $15. With
our new and improved affiliate program, your max earnings for those
three referrals is up to $366.50!!!!!!!!!!
PREMIUM members - when one of your direct referrals upgrade their
account to a Premium membership, you are instantly paid $2 for that
members upgrade. When that member refers a new member who upgrades to
premium you are instantly paid a $1 override commission. You just got
paid for doing NOTHING! Even better, that same scenario pays FIVE
LEVELS DEEP!
Let's take a look at what happens if you were to refer only five new
members to ClixSense.com and ONLY three of those members upgrade to a
Premium account. We'll use the same scenario through all five levels:
First there is yourself on your own level. You are guaranteed payment
for each advertisement you click on and view for just 30 seconds.
Level one - You referred 5 new free members = 50 cents. Now 3 of them
upgade which earns you another $6.00. Total so far is $6.50 plus your
paid to click ads.
Level two - Each of your referrals refer 5 free members of which three
each upgrade to Premium accounts. Your total now is $15.50!! ($6.50 for
level one, and $9 for level two.)
Level three - These members perform same as the above levels and only
refer an easy 3 upgrades each. Now your total earnings is $42.50!! ($27
for level three, and $15.50 for levels above.)
Level four - These members perform same as the above levels and only
refer an easy 3 upgrades each. Now your total earnings is $123.50!!
($81 for level four, and $42.50 for levels above.)
Level five - These members perform same as the above levels and only
refer an easy 3 upgrades each. Now your total earnings is $366.50!!
($243.00 for level five, and $123.50 for levels above.)
Imagine what happens if you refer more than three members or even just
three members per month! You get paid again when your referral renews
their annual Premium membership!
Think about it, the old affiliate program paid you a mere $15 when you
had three upgrades. The new and improved program pays you up to $366.50
for those same referrals!!
Free members (Non-Premium members) will still receive 10 cents for each
referral and will now receive $2 if their direct referral upgrades to a
Premium account. You will also continue to receive 10% of revenues
generated from your referrals ad purchases.
Premium members usually get more ads to view and get paid on, and now
can get paid 5 levels deep on their referrals. Upgrade your account to
Premium status today! SALI NA!!! SIGN UP NA MGA TOL! HERE:
http://www.clixsense.com/?2268753
LiveJasmin

Tuesday, October 30, 2007
Sunday, September 9, 2007
Hack DNS for Lightning-Fast Web Browsing
There's a simple way you can get to Web sites faster, and it won't cost you a penny. You can hack the way your PC uses the Domain Name System (DNS), the technology underlying all Web browsing. It's far simpler to do than you might imagine, as you'll see in this article.
Understanding DNS
Before you start, it's a good idea to get a basic understanding of how DNS works. When you type in a URL such as www.computerworld.com, that URL needs to be translated into a numeric IP address that Web servers and Internet routers can understand. When you type in a URL, a DNS server does the translation, from www.computerworld.com to 65.221.110.98, for example.
DNS servers live on the Internet, and your computer contacts them with the request to do that translation, which is commonly called name resolution. When you use an ISP, your computer will automatically use the default DNS servers specified by your ISP; you typically don't need to set up DNS in any way. If you're on a corporate network, your systems administrator may have set you up to use specific DNS servers.
If there's a delay in contacting the DNS server, or if the DNS server takes too much time resolving the address, you'll face a delay in getting to a Web site. So even if you've got the world's fattest pipe, your Web surfing will be slowed down.
If you could speed up the name resolution in some way, you'd be able to speed up your Web surfing. And that's exactly what I'll show you how to do.
Speed up Web browsing with OpenDNS
Here's the simplest way to hack DNS to speed up your Web browsing: Use free, superfast DNS servers run by the OpenDNS service instead of your ISP's DNS servers. OpenDNS has a monstrously big DNS cache, with DNS servers around the world, so you'll be able to retrieve IP addresses from it more quickly than from your ISP's DNS servers.
As I'll explain a little later in this article, the service includes other benefits as well, such as letting you create browser shortcuts so that you could go to www.computerworld.com, for example, by just typing the letter c in your browser and pressing Enter.
The addresses of the OpenDNS servers are 208.67.222.222 for a primary DNS server and 208.67.220.220 for a secondary server.
To use the OpenDNS servers, you'll have to tell your computer to use them. If you have Windows XP, first select Control Panel --> Network and Internet Connections --> Network Connections, right-click your network connection from the Network Connections window, and select Properties. A dialog box like that shown below appears.
 | |
| Highlight the Internet Protocol (TCP/IP) listing and select Properties in order to get to a dialog box that will let you use OpenDNS server. (Click image to see larger view.) |
Scroll down to the Internet Protocol (TCP/IP) listing and select Properties. At the bottom of the screen, select "Use the following DNS server addresses." For the Preferred DNS server, enter this address: 208.67.222.222. For the Alternative DNS server, enter this address: 208.67.220.220. Click OK, and then click Close and Close again. Restart your PC in order for the settings to take effect. The figure below shows the screen filled out properly.

| Telling your PC to use the OpenDNS servers. (Click image to see larger view.) |
If you're using Windows Vista, select Control Panel --> Network and Internet --> Network and Sharing Center. Click the View Status link on the right side of the screen. The Local Connection Status screen appears, as shown in the figure below. Click Properties.

| Click Properties in order to get to a dialog box that will let you use OpenDNS servers. (Click image to see larger view.) |
You'll come to the same dialog box as you would for XP that lets you use the OpenDNS servers. Follow the same directions as for using OpenDNS on XP, and you'll be set.
When you configure a PC to use OpenDNS, only that PC will be able to use the OpenDNS servers. If you want all of the PCs on your network to use the servers, you can tell your router to use the OpenDNS servers, and then all of your PCs on the network will follow suit. That way, you won't have to configure each individual PC.
The way you do this will vary from router to router, and it changes according to whether you're using a router for a home office/small office or a larger corporate router. For a small office/home office router, you'll log into your router, look for the DNS settings, and then use the OpenDNS settings of 208.67.222.222 for the primary DNS server and 208.67.220.220 for the alternative DNS server.
Whether you run a small network or larger network, you can get benefits beyond faster DNS. The service also gives you DNS management tools such as domain blocking. It also gives you statistics and charts about your network's DNS use.
On Linksys SRX 400 and many other Linksys routers, log into your router by going to the log-in page at 192.1681.1, using admin as the password and leaving the username blank. Scroll down the page until you come to the Static DNS 1 and Static DNS 2, as shown in the figure below. Click Save Settings. Restart your router and the PCs on your network, and they will begin using the OpenDNS DNS servers.

| Change the DNS settings on this screen to use the OpenDNS servers for your entire network. (Click image to see larger view.) |
If you run a corporate network and need help getting it set up, your best bet is to go to the OpenDNS FAQ page.
Note that OpenDNS may not work when using a virtual private network. For example, I wasn't able to get it to work using a Cisco VPN. And if you're on a corporate network, you should check with your systems administrator before using OpenDNS.
OpenDNS also lets you create shortcuts that let you visit Web sites by typing in a letter or group of letters instead of a full URL. To do that, you'll first need to register, which is free. After you do that, go to the site, log in, and click the Shortcuts link. On the page that appears, type in the shortcut text in the top box, and the URL in the bottom box and click Create Shortcut. From now on, when you type the shortcut text into your browser window, you'll be sent to the full URL.
You can also add the OpenDNS bookmarklet (found at the bottom of the page) to your browser and, in that way, create a shortcut no matter where you are on the Internet.

| Creating a shortcut in OpenDNS. (Click image to see larger view.) |
Speed up Web access with a HOSTS file
There's another way to speed up DNS -- by creating or editing a local HOSTS file on your own PC that contains URLs (also called hostnames) and their corresponding IP addresses. Windows will first look there to see whether there's an entry for the hostname, and if it finds it, it will resolve the address itself. That way, you won't have to go out to a DNS server and wait for the response before visiting a Web site.
The HOSTS file is a plain-text file you can create or edit with a text editor like Notepad. You should find an existing HOSTS file in C:\Windows\System32\Drivers\Etc\HOSTS in both Windows XP and Windows Vista. (In some versions of Windows, it may be located in C:\Winnt\System32\Drivers\HOSTS). The file has no extension; it is named only HOSTS. If you don't find one, create it in Notepad.
Open the HOSTS file in Notepad and enter the IP addresses and hostnames of your commonly visited Web sites, like this:
65.221.110.98 computerworld.com
Each entry in the file should be on one line. The IP address should be in the first column, and the corresponding hostname in the next column. At least one space should separate the two columns. When you're finished editing the file, save it to its existing location.
Make sure to check your HOSTS file regularly and keep it up-to-date, or else you might deny yourself access to certain Web sites. For example, if www.computerworld.com were to change its IP address but your HOSTS file kept the old, incorrect address, your browser would not be able to find the site.
Adjust Windows' DNS cache
To speed up DNS, Windows puts the DNS information into a local DNS cache on your PC when you visit a site. So when you want to go to a site, Windows first looks in its local DNS cache, called the resolve cache, to see whether the DNS information is contained there. That way, if it finds the information locally, it doesn't have to look in your HOSTS file or query a remote DNS server to find IP information. The cache is made up of recently queried names and entries taken from your HOSTS file.
The cache contains both negative and positive entries. Positive entries are those in which the DNS lookup succeeded and you were able to connect to the Web site. When Windows looks in the cache, if it finds a positive entry, it immediately uses that DNS information and sends you to the requested Web site.
Negative entries are those in which no match was found, and you end up getting a "Cannot find server or DNS" error in your browser. Similarly, when Windows looks in the cache and finds a negative entry, it gives you the error message without bothering to go out to the site.
Negative entries can lead to problems. When you try to make a connection to a site that has a negative entry in your cache, you'll get an error message, even if the site's problems have been resolved and it's now reachable.
You can solve this problem, though, using a Registry hack. By default, Windows caches negative entries for five minutes. After five minutes, they're cleared from your cache.
But if you'd like, you can force Windows not to cache these negative entries so that you'll never run into this problem. Run the Registry Editor by typing Regedit at a command prompt or the Windows Vista search box, and press Enter. Then go to HKEY_LOCAL_MACHINE\SYSTEM\CurrentControlSet\Services\Dnscache\Parameters. Create a new DWORD value with the name NegativeCacheTime and give it a value of 0. (The value might already exist. If it does, edit its value to 0.)
The DWORD determines how much time, in seconds, to keep negative entries in the DNS cache. If you like, you can have the entries stay alive for one second by giving the DWORD a value of 1.
After you're done editing, exit the Registry. To make the change take effect, restart your computer, or flush your cache by issuing the command ipconfig /flushdns at a command prompt. The command will flush your DNS cache -- all the entries, both positive and negative, will be flushed -- and it will be empty until you start visiting Web sites. Negative entries, however, will not be added to the cache if you've given the DWORD a value of 0.
You can also use the Registry to control the amount of time positive entries are kept in the DNS cache. By default, they are kept for 24 hours. To change the default, go to HKEY_LOCAL_MACHINE\SYSTEM\CurrentControlSet\Services\Dnscache\Parameters again and create a DWORD value called MaxCacheEntryTtlLimit. (If it's already present, just edit the value.) For the value, enter the amount of time you want the entry to remain, in seconds, making sure to use decimals as the base.
Saturday, September 8, 2007
Motorola CAnopy Override Plug: Default Plug
Make sure you are using RJ12 and not RJ11 ends. (The difference being 6 brass tabs instead of 4) RJ11’s are physically the same size as RJ12’s but will not work.
pin 1 white / orange (GPS sync)
pin 2 white / green (Serial Tx 9600)
pin 3 white / blue (Serial Rx 9600)
ping 4 green (Default Jumper)
pin 5 blue (Audio /GPS Power sync)
pin 6 orange (Ground)
This override plug resets the LAN 1 IP address to 169.254.1.1. The plug allows the operator to access the module through the default configuration without changing the configuration. The operator can then view and reset any non-default values.
Acquiring the Override Plug
To fabricate an override plug:
1. Install an RJ-12 6-pin connector onto a 6-inch length of CAT 5 cable.
2. Pin out all 6-pins.
3. Short (solder or twist together) Pins 4 and 6 on the other end. Do not connect any other wires to anything. The result should be as follows:
Pin 1 → white / orange ← Pin 1
Pin 2 → white / green ← Pin 2
Pin 3 → white / blue ← Pin 3
Pin 4 → green ← Pin 6
Pin 5 → blue ← Pin 5
Pin 6 → orange← Pin 4

here's how you should number your RJ-11 6-pin socket..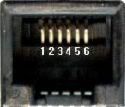
Using the Override Plug
The operator can regain access to the module as follows:
1. Insert override plug into the RJ-12 GPS sync port of the module.
2. Apply power to the module through the Ethernet cable.
RESULT: The module reboots with the default IP address of 169.254.1.1, password fields blank, and all other configuration values as previously set.
3. Set passwords as desired.
4. Change configuration values if desired.
5. Save the settings.
6. Remove the override plug.
7. Power cycle the module.
How to Tweak your Smartbro Motorola Canopy
1. Go to your web browser, type “169.254.1.1″ to access the canopy interface.
NOTE:In case the canopy configuration page didnt show up, go to
For Internet Explorer:
Just Go to Tools-> Internet Options-> Connections->LAN Settings-> Use Proxy Server
For Mozilla FireFox:
Just Go to Tools-> Option-> Advance-> Network-> Settings-> Use Manual Proxy Configuration
and remove the proxy and set to "direct connect to internet
2. You will be brought to the “STATUS” page. The navigation tabs are located at the left panel.
3. For a good connection, the word “REGISTERED” must be written in the “session status” and the “Jitter value should be low (lower=less interference).
4. Now return to the navigation panel, go to “Configuration”. The only value here that will concern you is the “Color Code” value.
5. Return to the navigation panel and then choose “AP Eval Data”. This is the most important aspect since this is where the available AP or Access Point for every connection is displayed. Every AP is separated by ************. This is where the technicians look for signal during the canopy installation. You can also change the signal by repositioning the antenna or simply turning it while clicking “Rescan APs”. The values will change depending on the signal strength being received. You can view how many users are connected to a specific base station by clicking AP EVAL DATA. Its important to know that Jitter and RSSI data is important. Having a lower Jitter is good and having a higher RSSI value than 800 is also better.
The Important factors here are:
a. “Multipoint Avail” - In order to know if the canopy has a signal to the base station, its value must be “1″, “0″ means no signal.
b. “SectorUserCount” - Shows how many connections are using that particular AP.
6. Return to the “Configuration” tab if you were able to get a good AP signal AP, change the “color code” value with the value you get from the scan AP process. Click save changes then reboot.
7. Now return to the status page and hit refresh until you see that the word “REGISTERED” is displayed,(You can also see your canopy’s distance from the AP here). If you receive the words “scanning or registering” just continue hitting the refresh tab until “registered” comes up. Make sure you have a low jitter level (If its greater than 11, this means that there is too much interference and you need to find a new AP).
8. If everything works out fine (You’re “REGISTERED”, have Good Jitter levels) proceed with testing your connection by pinging google, or some other test you have in mind. Exit then open your browser and you will be redirected to the smart portal where you will be required to input your password so that it will update (Use the password from the first installation). Save changes then reboot.
NOTE 1: Make sure that you clear all LOGS from the canopy page.
NOTE 2: You can also check your connection to the Base station by clicking LINK TEST. This test will show you how efficient your connection to the base station.
NOTE 3: Warning changing anything might damage your antenna if you dont know what your doing so don’t save anything.
NOTE 4: Just change your Lan IP connection to "obtain an IP address automatically" if you want to browse again. If you cant connect..then just ipconfig/release and /renew again to refresh your ip address.
How to Access Motorola Canopy Radio
Para sa mga Smartbro users na gustong buting-tingin ang kanilang Radyo pero naka-log out ang administator..
Open your browser IE/Mozilla firefox/Opera etc, at your address bar type the address 169.254.1.1

Click Log on
username: root
for password just leave it blank
you can now Configure your Radio..
Open your browser IE/Mozilla firefox/Opera etc, at your address bar type the address 169.254.1.1

Click Log on
username: root
for password just leave it blank
you can now Configure your Radio..
SmartBro Proxy Increase Browsing Speed by 30%
For SMART BRO Users
For Internet Explorer:
Just Go to Tools
-> Internet Options
-> Connections
->LAN Settings
-> Use Proxy Server
For Mozilla FireFox:
Just Go to Tools
-> Option
-> Advance
-> Network
-> Settings
-> Use Manual Proxy Configuration
For Address:
For Internet Explorer:
Just Go to Tools
-> Internet Options
-> Connections
->LAN Settings
-> Use Proxy Server
For Mozilla FireFox:
Just Go to Tools
-> Option
-> Advance
-> Network
-> Settings
-> Use Manual Proxy Configuration
For Address:
Code:
For Port:
203.84.191.215 or proxy.meridian.ph
For Port:
Code:
This Proxy is for SmartBro Users Only.8080
Subscribe to:
Posts (Atom)

